Subscribe
How to Create a Custom Page in WordPress

In today’s digital age, a website for your business or personal brand is necessary. WordPress, the world’s most popular content management system, offers a wide range of tools and features to help you create a website that is tailored to your needs.
One such feature is the ability to create custom pages, which can be used to showcase specific content, products, or services.
Custom pages can set your website apart and help you achieve the unique look and functionality you desire. However, many users find the process of creating a custom page in WordPress to be daunting and time-consuming.
In this guide, we will walk you through the steps of creating a custom page template in WordPress, making it easy for you to achieve the custom page of your dreams.
Content Outline
- Why create a custom page in WordPress
- Creating a custom page using the WordPress block editor
- Creating a custom page using beaver builder
- Creating a custom page manually
- Conclusion
Why create a custom page in WordPress?
The appearance of each new page created in WordPress is controlled by the theme’s template file, specifically the page.php template. However, you may use a different design for different pages rather than the same one for every page.
Landing pages typically feature distinct elements, such as prominent hero images or calls to action (CTAs), that set them apart from regular website pages.
Creating unique designs for landing pages using standard templates can take time and may limit your design options, making it challenging to achieve the desired outcome. As a result, it cannot be easy to achieve a high conversion rate on a sales page.
To overcome these limitations and create a landing page with a custom design, layout, and content, we will explore different methods for creating custom pages in WordPress. You can use the following methods to create a custom page that best suits your needs:
- Using WordPress block editor
- Using Beaver Builder
- Creating custom page manually
Creating a custom page using the WordPress block editor
To design custom templates using the block editor, you can use the tools you’re familiar with. However, this method is only compatible with themes that support blocks. If your theme is not compatible, consider using a page builder.
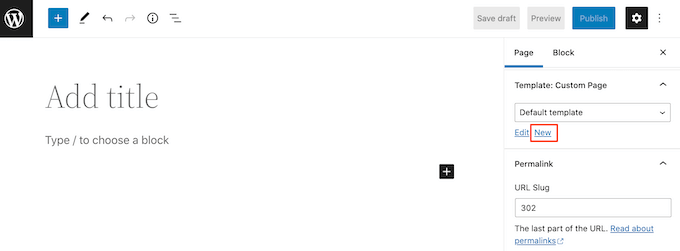
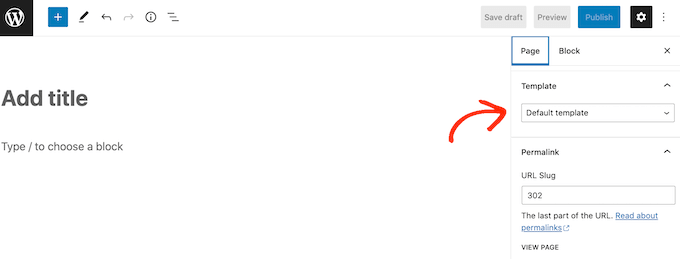
Step 1: To begin, open a page or post, go to the Page tab in the right-hand menu, expand the Template section, and click on the New link to create a new template.
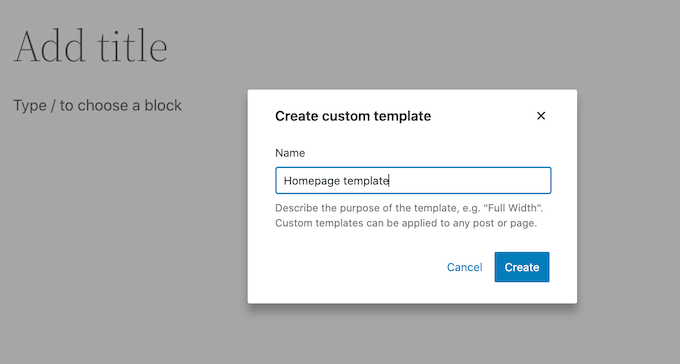
Step 2: In the pop-up that appears, enter a name for your template and click Create. You can put anything in place of the name, as it’s for your reference only.
Step 3: The template editor can be launched and works similarly to the standard block editor. To add blocks to the custom page design, click the blue + button and use the drag-and-drop feature to add them.
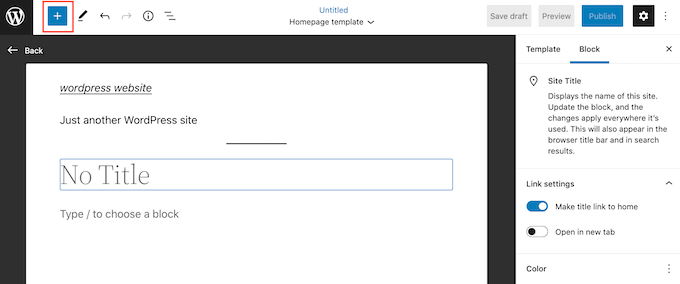
Step 4: You can use the standard WordPress editing tools to modify the content and formatting of a block, such as typing text into a heading block and applying bold formatting or adjusting the heading level from H2 to H3.
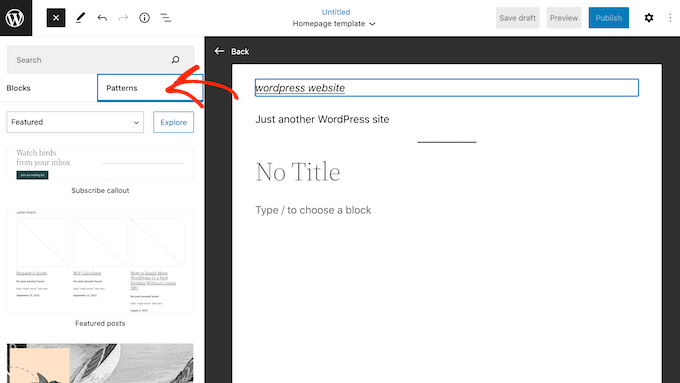
Step 5: In this step, you can create a custom page by using pre-designed collections of blocks called patterns. These patterns, such as event lists, captioned images, or pricing tables, can be found by accessing the Patterns tab and are dependent on the WordPress theme being used.
Step 6: Add a block pattern to your layout by dragging and dropping it or clicking on it to add it to the bottom of your template. Once you are satisfied with the template, press the Publish button and click Save.
You can now use the template you created on any page. To do so, open the page in the editor and select the custom template you created from the Template drop-down menu in the right-hand menu.
You can now add content to the page as you would with any other WordPress page, allowing you to create a fully customized page. Once the page is saved, you can view the new template on your website.
Creating a custom page using Beaver Builder
Beaver Builder is a page builder plugin for WordPress that allows users to create custom pages using a drag-and-drop interface. It can be used to create various page layouts, including landing pages, home pages, and blog posts. To use Beaver Builder to create a custom page in WordPress, you will first need to install and activate the plugin on your site.
Step 1: After activating the plugin, go to Settings, click on Beaver Builder, and select the License tab.
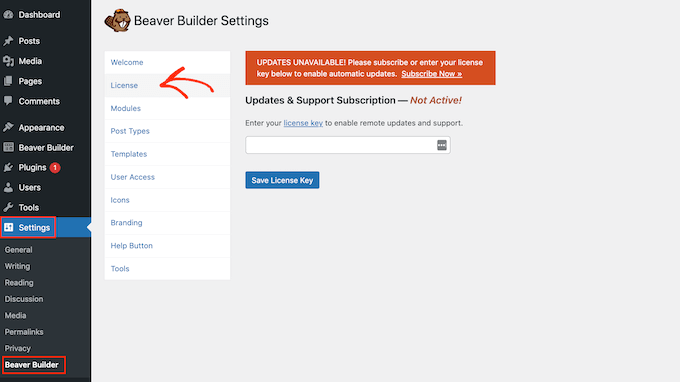
Step 2: Once you are on the license tab, enter the license key that you can find in your account on the Beaver Builder website, and then click Save License Key to activate it.
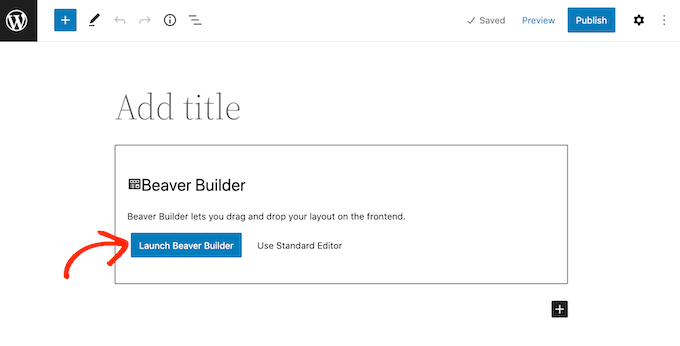
To create a custom page using Beaver Builder, go to the Pages section in your WordPress admin dashboard and select Add New. Then click on the Launch Beaver Builder button to build your custom page.
Step 3: Beaver Builder editor will open and it’ll allow you to customize your page. If the right-hand menu is not visible, you can open it by clicking the + icon in the top-right corner.
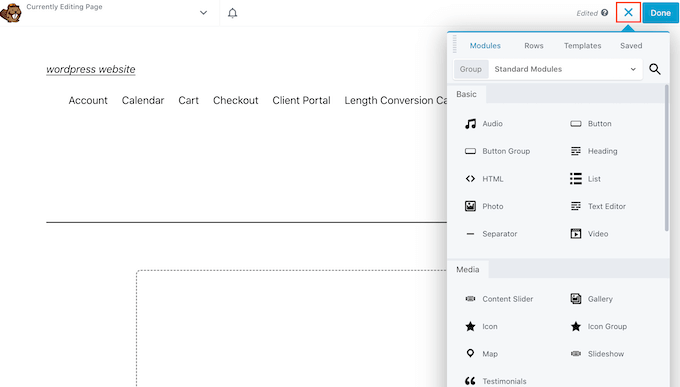
Step 4: The right-hand menu has all the different modules and rows you can add to your custom page, which are the core parts of Beaver Builder pages. To add a module or block to your custom page, find the desired one in the menu, and drag and drop it onto the page editor.
An alternative option is to begin with a template. Go to the Templates tab to view different Beaver Builder designs. You can then select any template and add it to your page.
Step 5: To make any modifications to a template, click on it. This will allow you to edit the template’s text, images, colors, and other elements.
In the image shown, we are editing the page heading, which can be done by clicking on it. However, the editing process in Beaver Builder is less seamless than in other editors, and changes need to be made in a separate pop-up box that opens upon clicking on the page heading.
Step 6: Once you are satisfied with how your custom page looks, click the Done button. Then you have the option to save the post as a draft or publish it to be visible on your WordPress website.
Creating a custom page manually
Another option for creating a custom page template in WordPress is manually coding it. Similar to the page.php file, this template allows for control over the page’s appearance.
This method does require coding knowledge, making it less accessible for beginners. However, it does provide the opportunity to create a custom page without needing additional plugins. If only a small number of custom pages are needed, this manual coding method may be preferred over a page builder plugin.
First, open a plain text editor such as Notepad on your computer. In the new, blank file, insert this line of code at the top:
1 <?php /* Template Name: CP1 */ ?>This code informs WordPress that this is a template file called CP1. You can give the template any name of your choosing.
Now, include all the code for the custom page layout. This template is similar to any other theme file in WordPress, and you can include HTML, template tags, and PHP code.
To assist in coding the template file, consider copying the existing page.php template provided by your theme. This can save time and ensure the custom page blends seamlessly within your WordPress website.
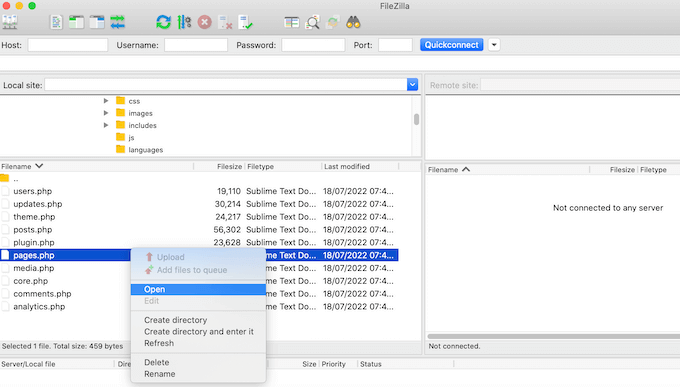
An easy way to copy the page.php code is to connect to your server using an FTP client like FileZilla or the file manager of your WordPress hosting platform, such as cPanel or SiteGround’s Site Tools.
Once you establish a connection, navigate to /wp-content/themes/ and open your current theme’s folder. Within this folder, locate the page.php file and open it using any text editor.
You can use this code as a foundation for your custom template and copy and paste it into your new template file.
However, if you copy and paste the code, make sure to omit the page.php header text, which is the commented-out section at the top of the file. You can design any layout you desire, but here’s an example of a basic custom page layout that we will use on our site:
<?php /* Template Name: CustomPageT1 */ ?>

<?php get_header(); ?>

<div id="primary" class="content-area">
    <main id="main" class="site-main" role="main">
        <?php
        // Start the loop.
        while ( have_posts() ) : the_post();

            // Include the page content template.
            get_template_part( 'template-parts/content', 'page' );

            // If comments are open or we have at least one comment, load up the comment template.
            if ( comments_open() || get_comments_number() ) {
                comments_template();
            }

            // End of the loop.
        endwhile;
        ?>

    </main><!-- .site-main -->

    <?php get_sidebar( 'content-bottom' ); ?>

</div><!-- .content-area -->

<?php get_sidebar(); ?>
<?php get_footer(); ?>
Now you can save the file, giving it any name you prefer, but ensure that you end the file name with the .php extension.
While you can add this file to any WordPress theme, creating a child theme is recommended based on your current theme. This way, you can update your WordPress theme without losing any customizations.
Using your FTP client or file manager, upload the custom template to your current theme’s directory. Once uploaded, create a new page in the WordPress dashboard or open an existing page where you want to apply the template.
On the right-hand side menu, select the Page tab and then expand the Templates section if it is not already open.
Conclusion
Creating a custom page in WordPress is a straightforward process. By following the steps outlined in this blog post, you can easily create a new page and customize it to meet the specific needs of your website.
If you are busy with your workarounds or not enough tech-savvy, you can transfer this works to WordPress experts who know how to work with the CMS.
Whether you want to add custom content, change the layout, or include additional functionality, WordPress makes it easy to achieve your goals. With some creativity and basic knowledge of the platform, you can create a custom page that stands out and makes a lasting impression on your visitors.