Subscribe
How to Fix the ERR CONNECTION TIMED OUT Error

Does your browser display the “ERR_CONNECTION_TIMED_OUT” error? That error notice isn’t exactly helpful, is it? It’s always a good idea to be aware of common mistakes like these that could prevent you from accessing your website if you use WordPress frequently.
The ERR_CONNECTION_TIMED_OUT error message is probably one of the most frustrating errors on the internet. It requires a complete browser refresh to fix it, and it is rather annoying. There are some easy ways you can fix the ERR_CONNECTION_TIMED_OUT error message.
We’re going to go deep into the “ERR CONNECTION TIMED OUT” error and look at potential causes as well as simple fixes. Simply put, it is a sign that the system is down, the time allotted for a connection has passed, and the request has now timed out. What does that mean, though?
How to fix the ERR_CONNECTION_TIMED_OUT error on your WordPress
- What is ERR_CONNECTION_TIMED_OUT error?
- Causes for ERR_CONNECTION_TIMED_OUT error
- Ways to fix ERR_CONNECTION_TIMED_OUT error
- Check your connection
- Disable antivirus or firewall on your PC
- Disable proxy settings
- Change DNS servers
- Renew DNS
- Check your host files
- Check the DNS of your domain
- Clear browser cache
- Fix the maximum execution time
- Disable your plugins temporarily
- Shift to the default theme temporarily
- Increase memory limit
- Conclusion
What is ERR_CONNECTION_TIMED_OUT error?
The ERR_CONNECTION_TIMED_OUT error is a browser-specific error that indicates that the browser was unable to establish a connection to the server. This can be due to a number of factors, including network congestion, server downtime, or a firewall blocking the connection.
Your browser will attempt to load a website for around 30 seconds before cutting off the connection. It will then issue an “ERR CONNECTION TIMED OUT” error, which denotes a communication issue.
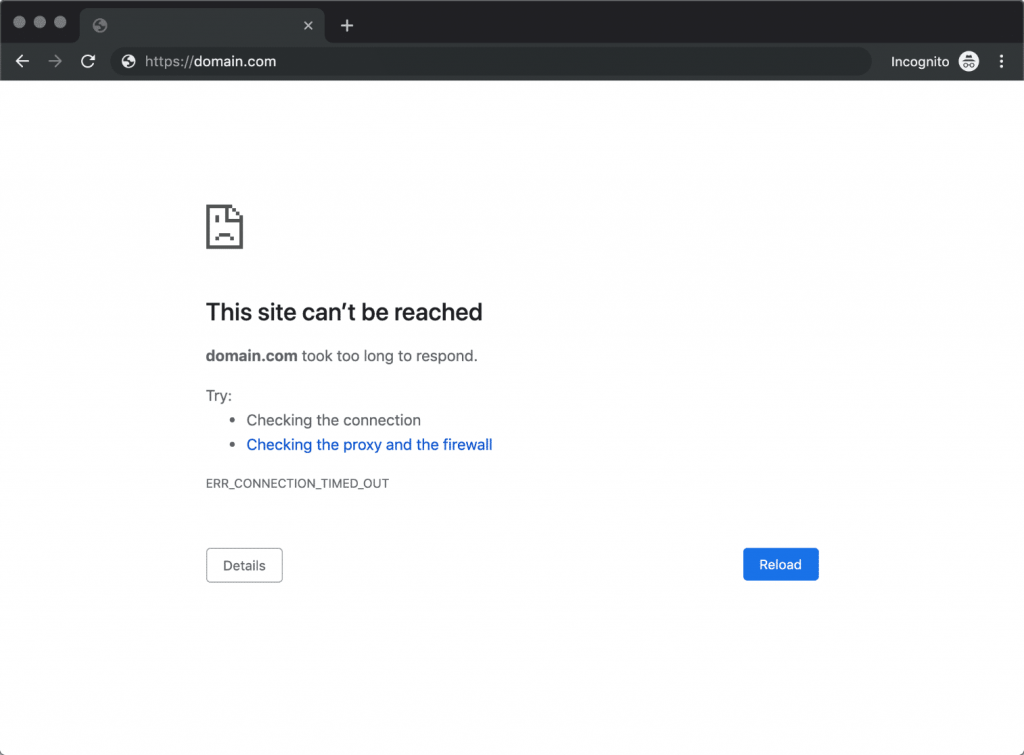
This error is often accompanied by a message from the browser stating that “Domain.com took too long to respond.” In some cases, the browser may also display the message “This site can’t be reached.”
Users may encounter this error when trying to access a website or web-based application. The error may also occur when the user is attempting to load a page that contains content from a third-party server, such as an advertisement.
The error can appear in numerous ways because there are so many distinct web browsers, operating systems, and servers. However, the majority of them have a meaning. Two extremely similar issues, “ERR NETWORK CHANGED” and “ERR CONNECTION REFUSED,” can frequently be fixed using the same troubleshooting techniques listed below.
Another frequent error number under “This site cannot be reached” is DNS PROBE FINISHED NXDOMAIN, a DNS error that effectively implies the requested domain does not exist.
A few examples of how the issue might appear in various browsers are provided below.
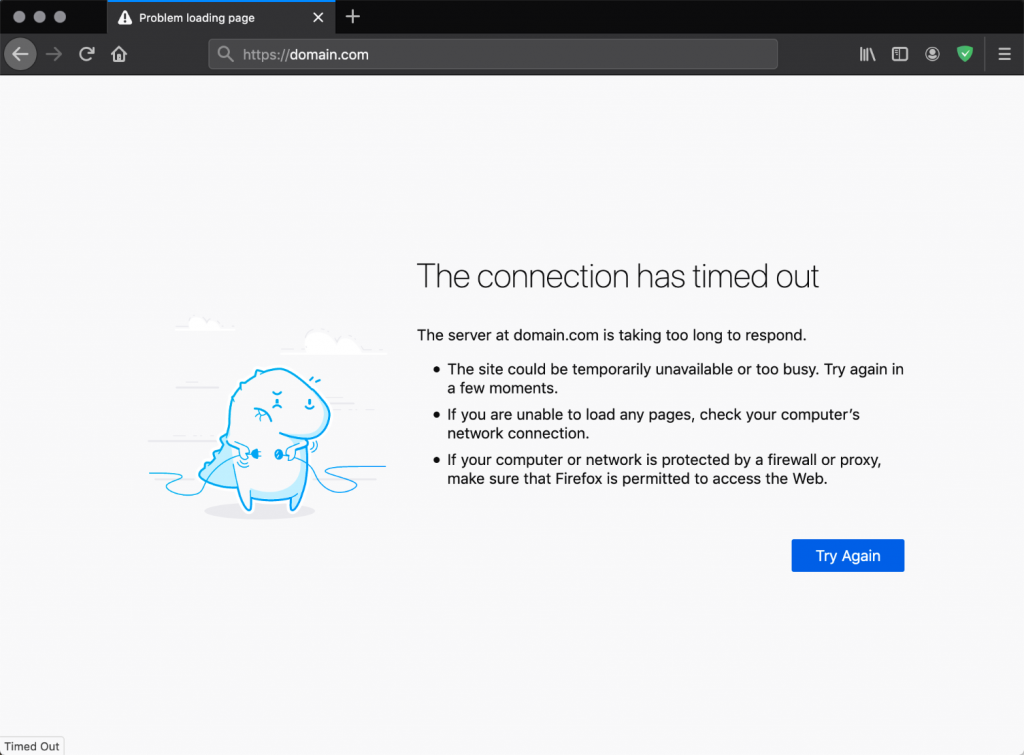
Firefox
The error message in Mozilla Firefox will read “The connection has timed out.” It takes too long for the server at domain.com to respond.
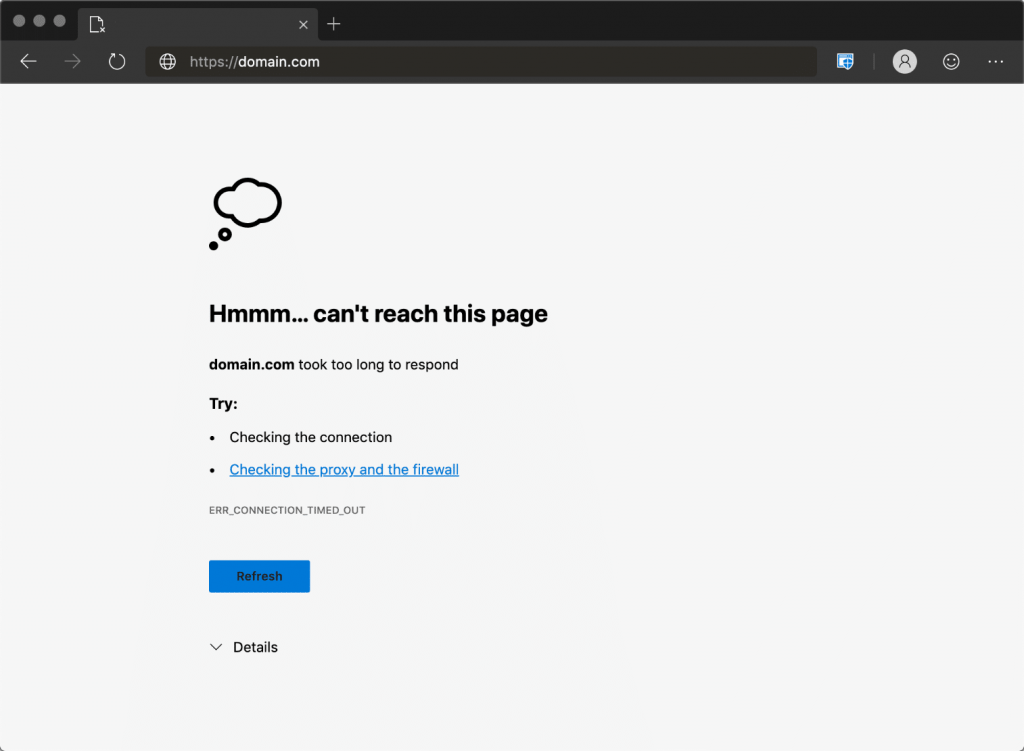
Edge
The error message in Microsoft Edge will read “Hmmm… can’t reach this page.” Domain.com took too long to respond. However, it also includes the “ERR CONNECTION TIMED OUT” error in Edge.
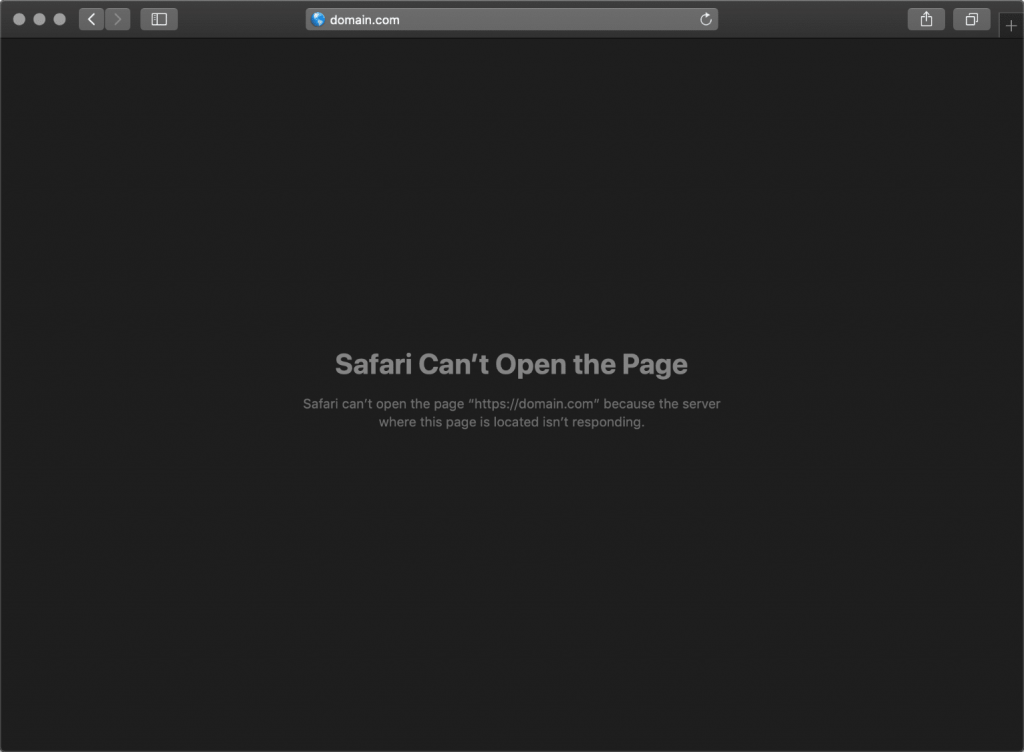
Safari
The error message in Safari will read, “Safari Can’t Open the Page. Safari can’t open the page domain.com because the server where this page is located isn’t responding.”
Causes for ERR_CONNECTION_TIMED_OUT error
There are a few potential causes for the ERR_CONNECTION_TIMED_OUT error. Some of them include:
1. Hindrance in database communication
The most common cause of this error is a network issue with the database server itself or between your computer and the database server. If the database server isn’t running, then there’s nothing you can do about it except wait until it starts up again.
When a server declines to transfer data that has been received back to the computer, a data request error happens. The network connection is lost as a result, and your server stops waiting for data.
2. Server timeout
Server timeout happens when the server you’re trying to connect to is simply taking too long to respond. This can be due to a number of factors, including high traffic on the server, a problem with the server itself, or a problem with your internet connection.
3. Firewall/anti-virus software issue
Another common cause of this error is a firewall or other security software on your computer or network that is blocking access to the server. This can happen if you’re trying to connect to a server on a different network, or if you’re trying to connect to a server that is configured to only allow connections from certain IP addresses.
4. Non-existent server
When software tries to connect to a server that isn’t there, either because it’s down or because the IP is wrong, a server timeout and error messages happen. As a result, your browser asks the server for data that it does not already have.
5. Network overload
When too many devices are trying to connect to the same network, the system can become overloaded and start to drop connections. This can happen during peak times when everyone is trying to get online at the same time, or if there is a sudden surge of traffic.
6. Slow internet
Slow or unreliable Internet connections are one of the most common causes of this error. If the system isn’t able to communicate with the server quickly, it’s possible that the server accepted the request but then timed out due to the slow response from the system.
7. Blocked website
If the host file or firewall/router Access Control settings forbid viewing the website you’re trying to access, you won’t be able to connect. As a result, you will see an error notice.
8. Multiple interference
Your server will sluggish or go offline if your wireless channel is overloaded by allowing too many requests at once.
Ways to fix ERR_CONNECTION_TIMED_OUT error
If you encounter this error on your WordPress website, where should you begin your troubleshooting? Without a lot of background information, it might be difficult to know where to start.
Typically, these are either client-side issues (such as problems with your network connection or firewall) or server-side issues (such as problems with the server that hosts the website) (memory limits, execution times, etc.).
The problem is that most users aren’t aware of how this error works or what causes it. They end up spending hours debugging their code without even realizing that it’s not their code that’s causing the problem at all.
There are a few ways that you can go about fixing the ERR_CONNECTION_TIMED_OUT error. First, we’ll share the steps you can quickly execute and then move on to the detailed steps in case the quick ones don’t work.
Ways to easily fix ERR_CONNECTION_TIMED_OUT error
1. Check other pages of your website
If you’re seeing the ERR_CONNECTION_TIMED_OUT error on the website you’re currently on, it’s likely that the error is happening on other pages of the website as well. To check if this is the case, try visiting other pages on the website to see if you’re seeing the same error.
If you encounter the same error on other parts of the website, it’s likely that something is wrong with that specific area. Try reloading the page at a later time, or contacting the website’s support to inform them of the problem. If you continue to receive the error on all pages, it’s possible that there might be an issue with the website you’re trying to visit.
2. Use your browser’s incognito mode
When you use the incognito mode in your browser, you are opening a new window that does not use your browsing history or cookies from your previous sessions. This means that:
- Any website you visit in incognito mode will not be able to track you or send you targeted ads.
- Any passwords or login information you enter in Incognito mode will not be saved, so you will need to re-enter them each time you close and reopen your Incognito window.
If you are experiencing the ERR_CONNECTION_TIMED_OUT error, one potential fix is to try opening the website you are trying to visit in Incognito mode. This will rule out any browser-related issues that may be causing the problem.
To open a website in Incognito mode, just launch your browser’s Incognito mode (usually by selecting it from the menu or by pressing the Ctrl+Shift+N shortcut keys) and then enter the website URL that you want to visit.
3. Check if the issue is website specific
Make sure the problem doesn’t only affect one website, as that would imply a problem with the website’s backend. This can be verified by using Chrome to visit several websites and observing whether the browser generates the same problem.
You can begin applying the changes listed below if the error continues on other websites, demonstrating that the issue is with the browser. You can still attempt the following fixes even if it only occurs on one page to be sure it’s not a browser problem.
Detailed ways to fix ERR_CONNECTION_TIMED_OUT error
1. Check your connection
You should verify your network connection, say, in Google Chrome, Firefox, or Edge. Even though it may seem obvious, they all suggest testing your connection because it’s one of the most typical causes of the error. Here are few suggestions that you can implement:
Restart your router and modem
If your internet connection is acting up, one of the first things you can do is restart your router. This will often clear up any minor technical issues and get your connection back up and running.
To restart your router, simply unplug it from the power outlet for 30 seconds and then plug it back in. Once your router is back on, try connecting to the internet again and see if the issue has been resolved.
Check if you need to fix the internet connection
Your network speed might be slower than usual for any unknown reason. You can run a quick speed test to know if your internet is running slowly. If you find that slow speed is the reason, try connecting to a different network. If you have access to another network at home or work, try connecting there instead.
If you are using an Ethernet cable, make sure that it’s plugged in and secured. If you are using Wi-Fi, make sure that you’re connected to the right network and that there aren’t any problems with it.
Check if other devices like laptops, smartphones, etc. can connect to the same network without any issues. If they can’t, there might be something wrong with your router or modem settings that needs fixing urgently by contacting your ISP (Internet Service Provider).
2. Disable antivirus or firewall on your PC
Antivirus software and firewalls are designed to safeguard users and their systems. They frequently scan your device and instantly prevent any suspicious activities. This level of protection can, however, occasionally cause connectivity problems.
Firewalls may reject totally safe content or block pages that aren’t necessary to block. This is something that programs like AVG have frequently demonstrated. To see if this applies to you, consider turning off your firewall and antivirus software. Naturally, this is only suggested if you are certain that the website you wish to access is secure.
Furthermore, you should only temporarily disable this kind of program. After you’ve checked to see if the mistake has been fixed, turn it back on so you don’t expose yourself to threats. You might want to think about switching to a different firewall or antivirus program if you consistently have issues.
These technologies also allow you to submit a report known as a “false-positive.” You can inform the program developer if you’re certain that a website you visit should not be restricted. Some quick links are provided below:
3. Disable proxy settings
If you use a proxy service, occasionally you could receive the ERR CONNECTION TIMED OUT error. Particularly on the client-side, this is typically quite uncommon. You might not even be aware that one was set, though. Follow these procedures to disable or verify that no proxy settings are active.
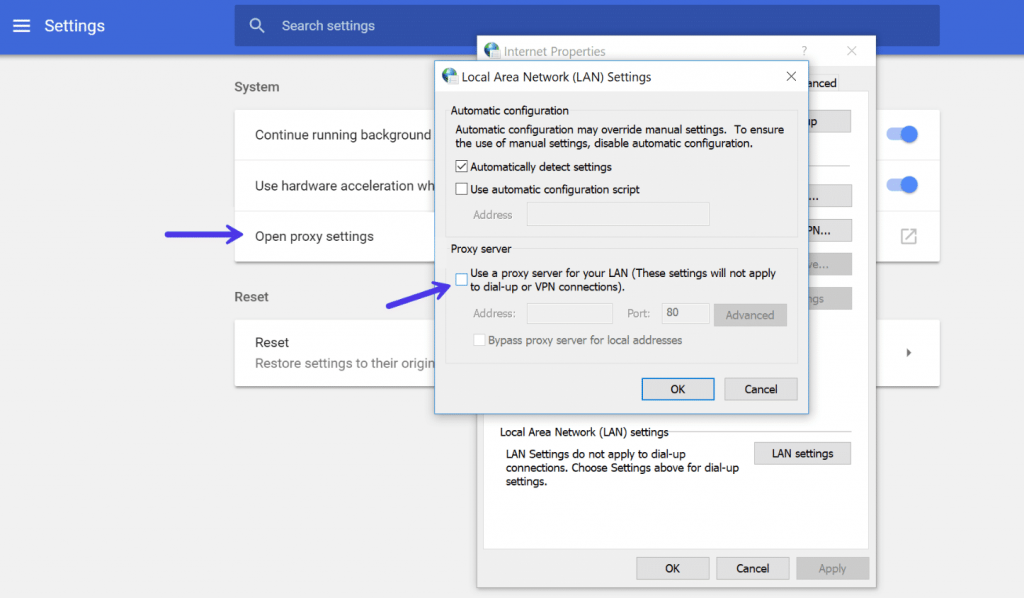
Open your Chrome browser and go to Settings. The entire menu of choices will be displayed as a result. There should be an entry labelled “Open proxy settings” in the System section (you’ll need to select Advanced at the bottom to see this). You will be sent to the corresponding menu by selecting it:

Depending on the system you’re using right now, your next move will vary. Windows users should select LAN Settings, click Use proxy server for LAN, and then uncheck the box. If you use a Mac, you should find yourself at the appropriate menu right away. The next step is to uncheck each proxy protocol that is selectable before checking to see if the ERR CONNECTION TIMED OUT message has been handled.
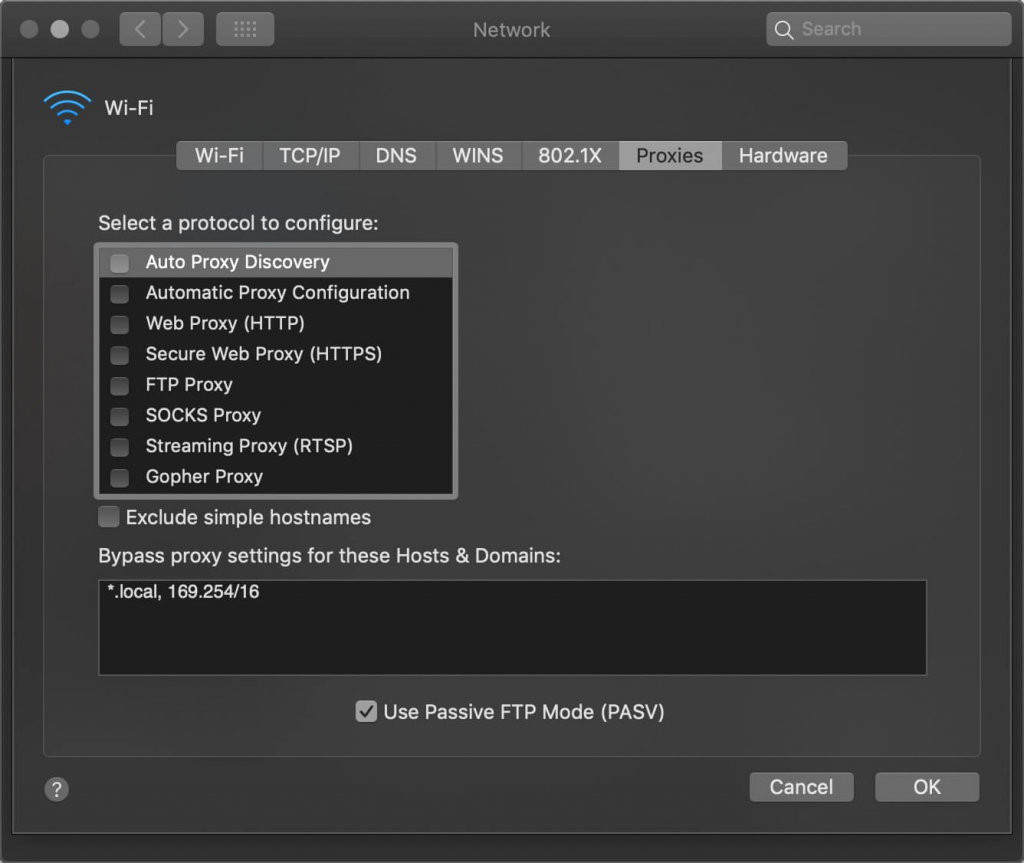
A “Local Area Network (LAN) Settings” window will display if you’re using Windows. Make sure the “Use a proxy server for your LAN” checkbox is not selected.
Using a VPN service like ExpressVPN or TunnelBear has the same effect. Verify that you are not accidentally connected. VPNs allow users to connect to a network while masking their IP address. This gives them access to websites that they would otherwise be denied if they were using a normal network connection.
4. Change DNS servers
Altering your DNS servers is the next thing you can try. DNS, or the Domain Name System, is a system that converts human-readable website names into IP addresses. DNS settings determine which DNS server is used to resolve a domain name.
DNS servers are organized into hierarchies, with each level of the hierarchy caching the results of queries for domains lower in the hierarchy. This speeds up the process of resolving domain names, as DNS servers can simply return the cached results instead of having to query the next level of the hierarchy.
Your ISP will, by default, choose DNS servers for you. However, you might try switching these temporarily to a public DNS server, like Google or Cloudflare.
- Due to them occasionally being more dependable, some people choose to utilise Google’s public DNS (8.8.8.8 and 8.8.4.4) over the long term.
- We will use Cloudflare’s safe and lightning-quick free DNS (1.1.1.1 and 1.0.0.1) in this example. The procedure is the same if you wish to use Google’s; you just swap out its DNS server addresses for yours.
Tip: Removing it and switching back to your ISP’s DNS servers might occasionally resolve problems if you are already using a free DNS server but are experiencing them.
There have been a few cases where switching back has remedied the issue. Google and Cloudflare aren’t ideal all the time. If you’re using a WiFi network in an airport or coffee shop, this is especially true.
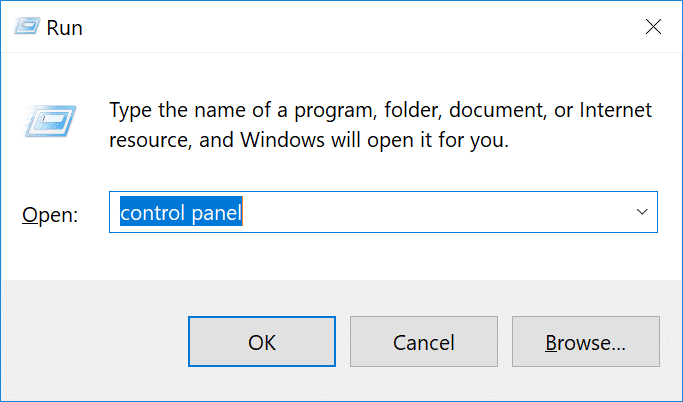
Windows
Simply hit the Windows key and R to launch Command Prompt in Windows. Enter after you write “control panel.”
Then select “Network and Sharing Center” by clicking “Network and Internet.” Click on “Change Adapter Settings” on the left side.
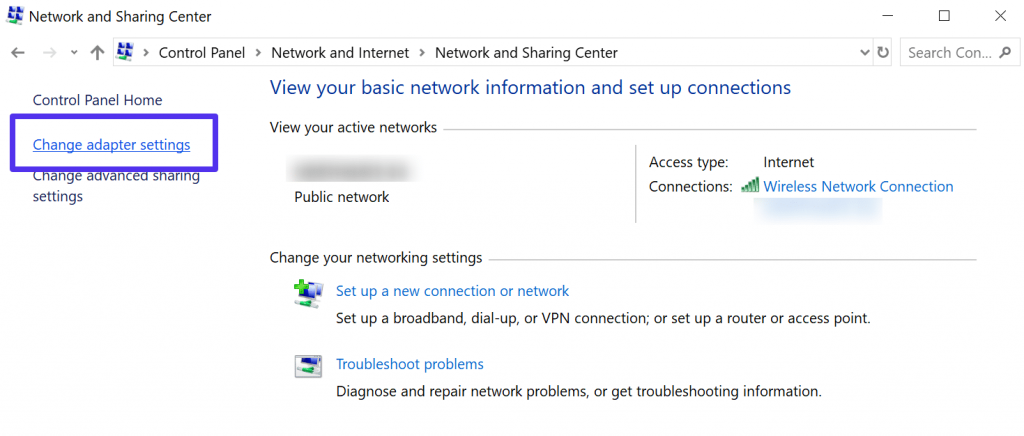
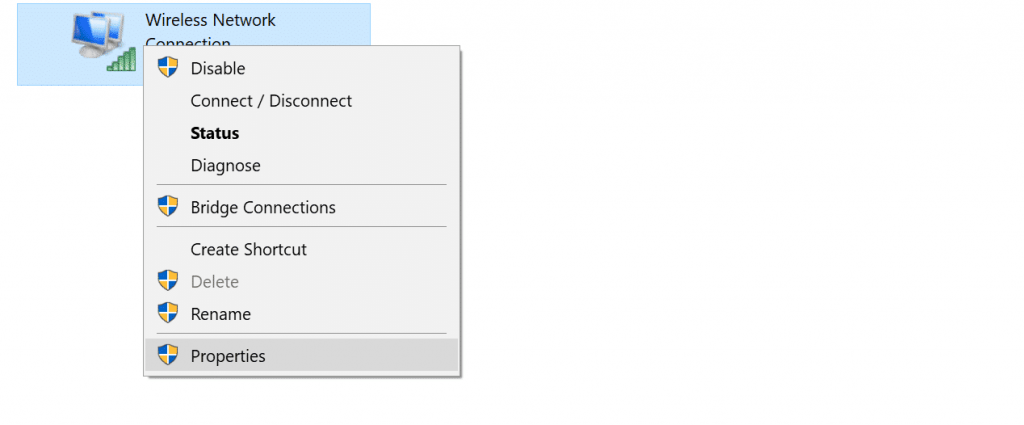
Depending on how you’re connecting, you can either select Local Area Connection or Wireless Network Connection by performing a right-click on it. Click “Properties” after that.
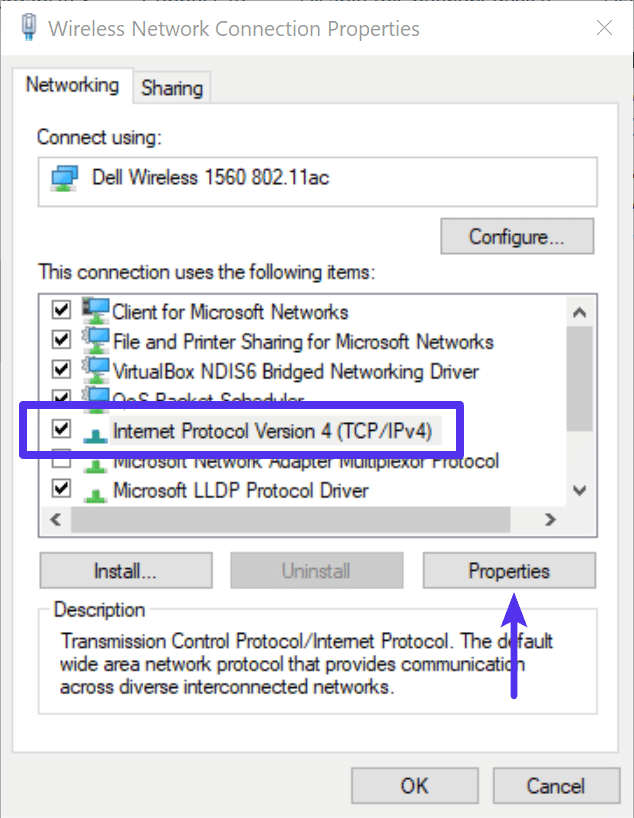
Choose Internet Protocol Version 4 (or Version 6 if preferred) and then click “Properties.”
In case you need to change anything back, make a note of the current settings. Select “Use the following DNS server addresses” from the menu. Add the following, or change what’s there with these:
For IPv4: 1.1.1.1 and 1.0.0.1
For IPv6: 2606:4700:4700::1111 and 2606:4700:4700::1001
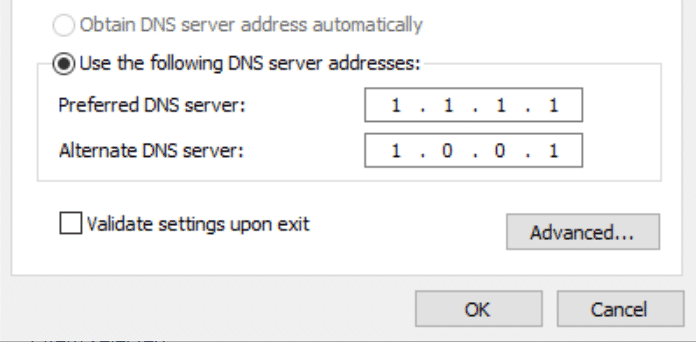
Click OK to finish the process, and then click Close. Afterwards, restart your computer to see if the error goes away.
Mac
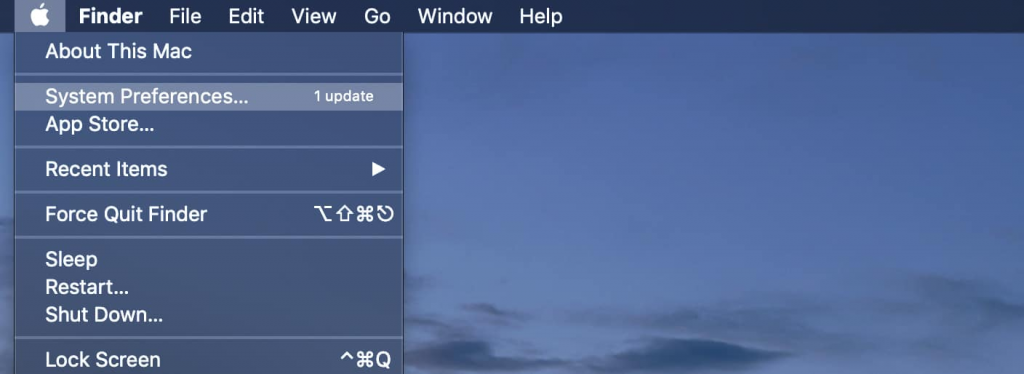
Go to System Preferences on a Mac to change the DNS servers.
Click “Advanced” after selecting the network icon.
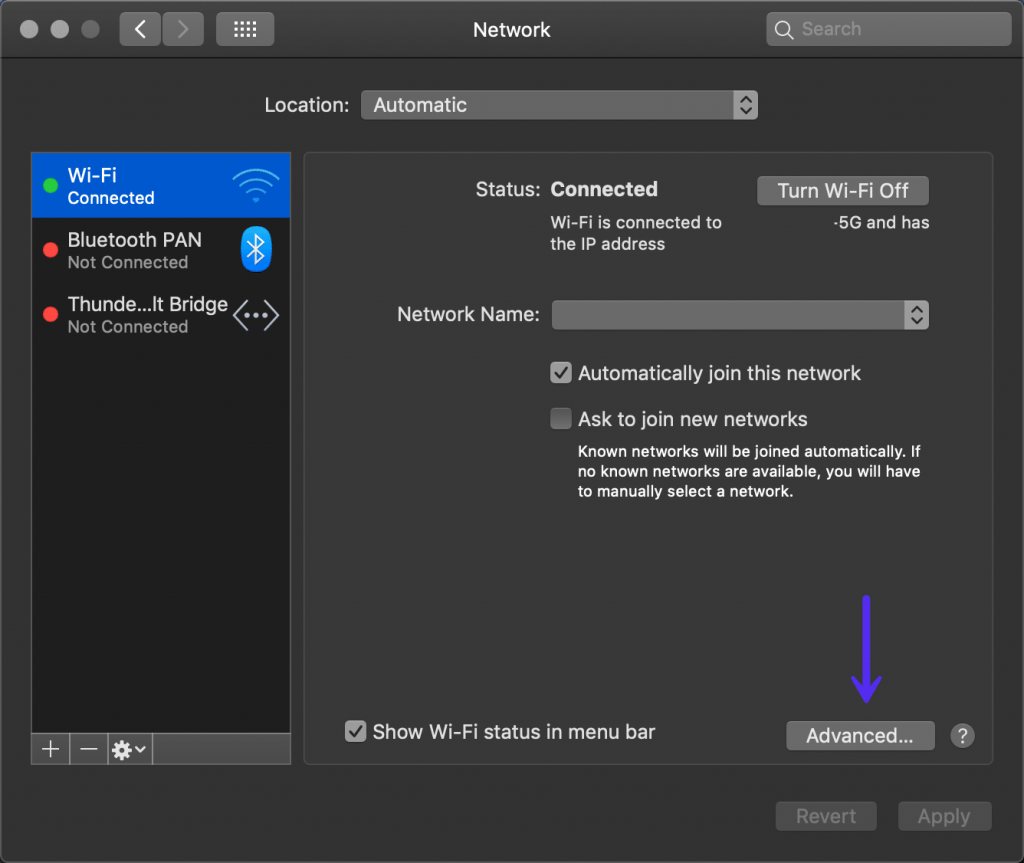
Select the DNS tab.
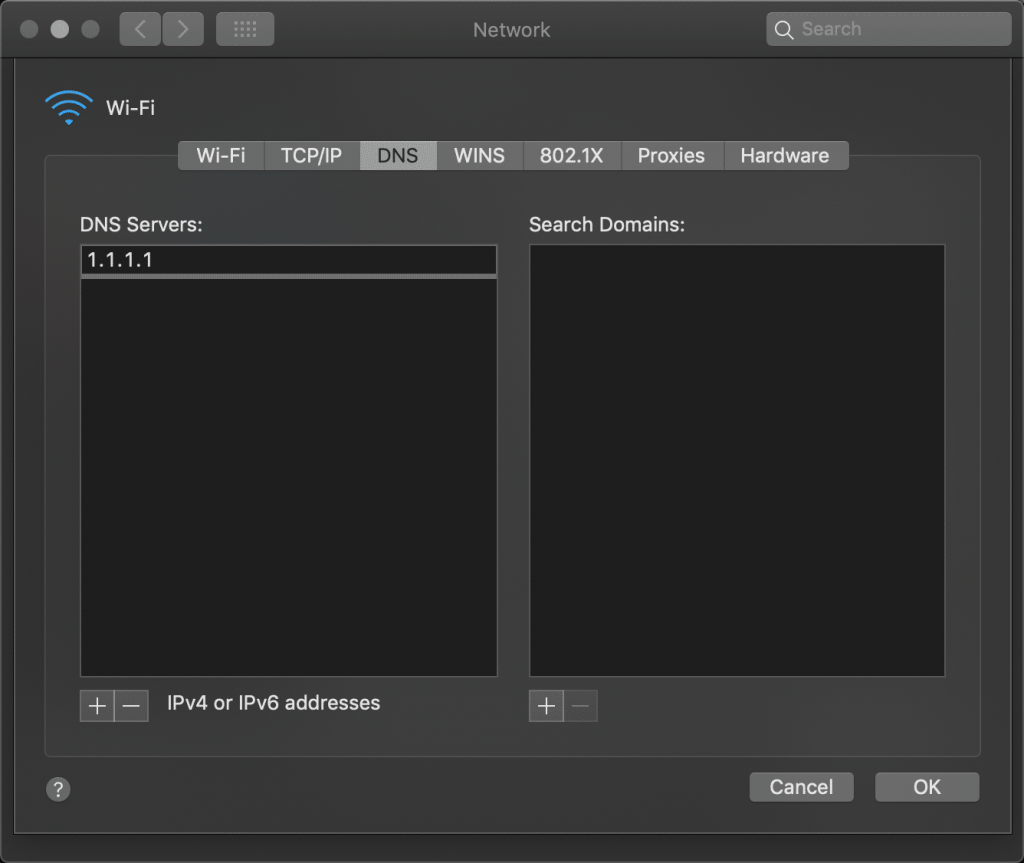
Then include the DNS server addresses for Cloudflare.
For IPv4: 1.1.1.1 and 1.0.0.1
For IPv6: 2606:4700:4700::1111 and 2606:4700:4700::1001
5. Renew DNS
You can try to flush/renew your local DNS cache as well. This is equivalent to clearing the cache in your web browser. The website you are trying to access might not be resolving to the proper IP address.
It’s crucial to wait for things to properly propagate if you recently moved your WordPress site to a new host. Even while it can happen in a matter of minutes, this process occasionally takes up to 24 hours. The TTL value of your DNS records and your DNS provider both play a role in this.
Windows
Simply launch Command Prompt in Windows and type:
ipconfig /flushdns
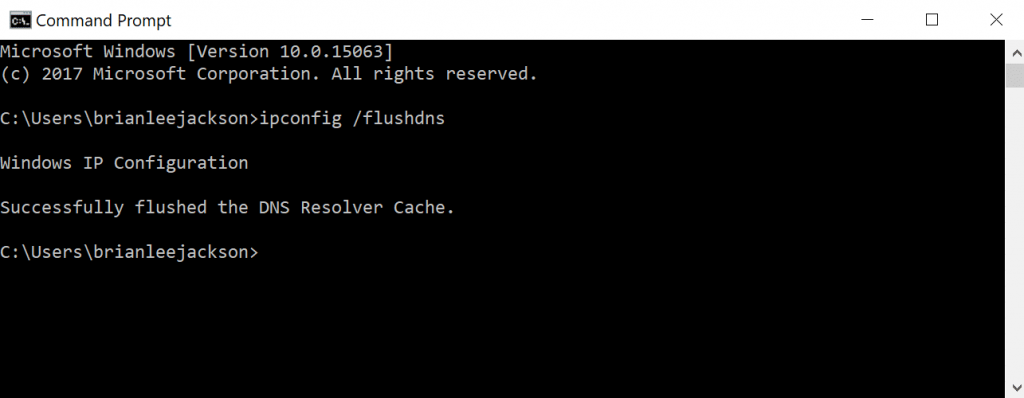
If the command execution is successful, you will notice “Successfully flushed the DNS resolver cache.”
Mac
You can type the following in the terminal if you’re using macOS:
dscacheutil -flushcache
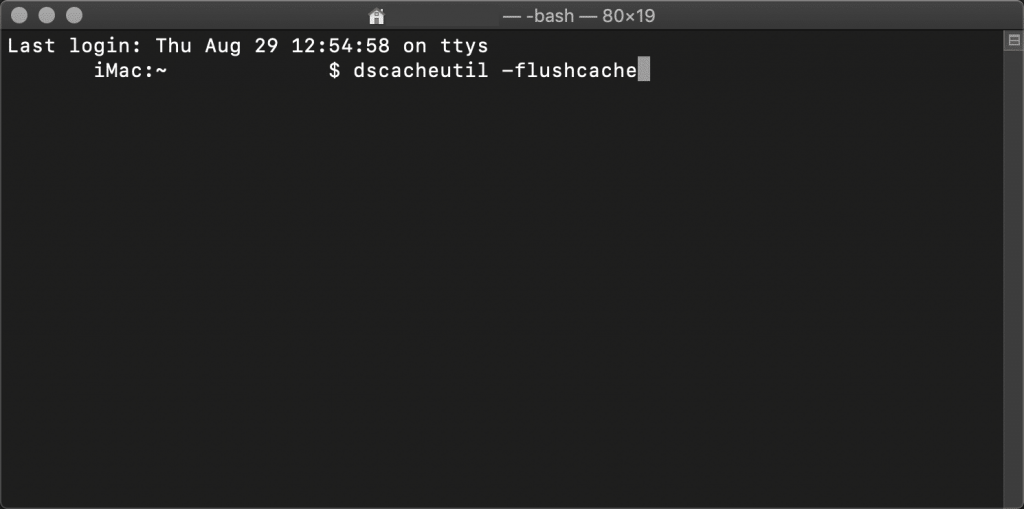
Note: If the above step is successful on Mac, then it doesn’t show any success message.
6. Check your host files
Every computer has a “local hosts file,” as they like to call it. This file contains manual DNS entries that have been assigned to particular IP addresses. Only when you wish to evaluate your DNS before moving domains to a new server is this usually modified. Or perhaps you’re utilizing a program like Vagrant or Docker to run a local development site.
There are numerous ways in which you can alter or update this file. As a result, it’s wise to always check to make sure the website you’re attempting to access isn’t included. The steps are listed below.
Windows
More access is often needed to the hosts file. As the first step, open your text editor as an administrator. Simply locate your text editor in the start menu, right-click on it, and choose “Run as administrator.” Any text editor, including Notepad, Notepad++, Atom, etc., can be used for this. In the example below, Sublime is being used.
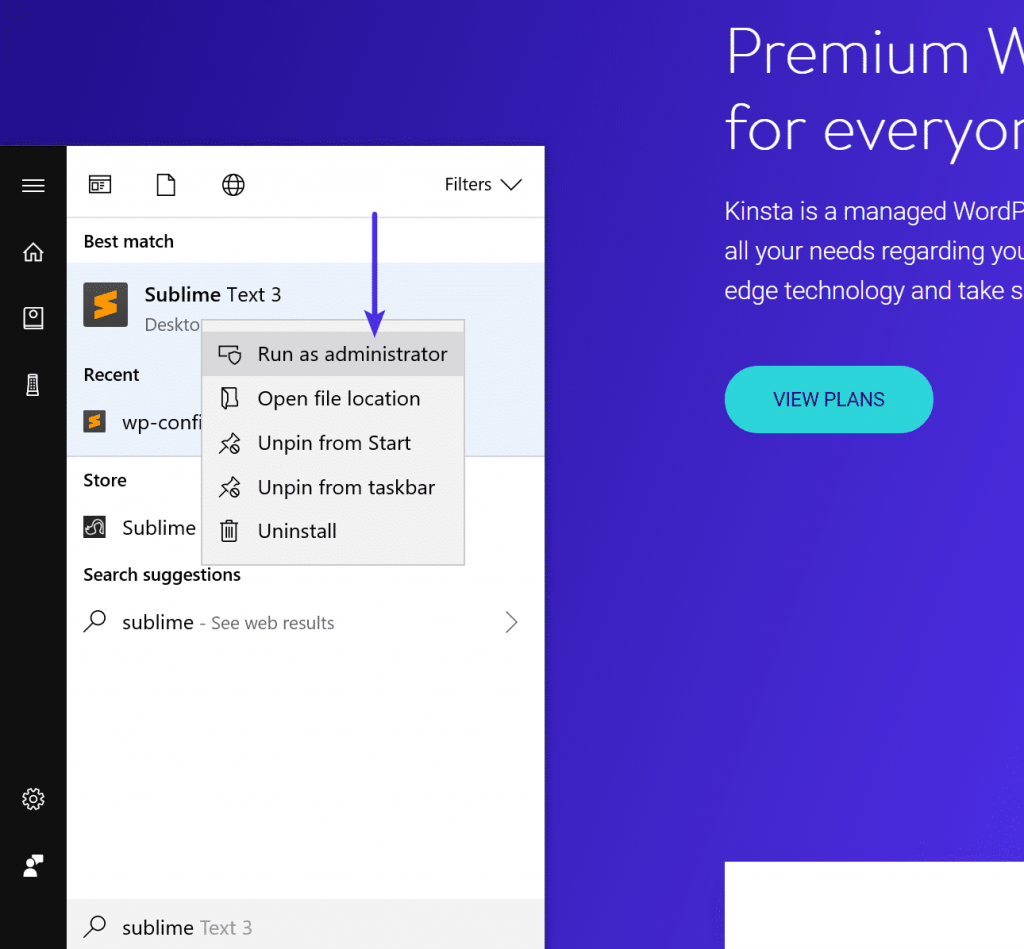
Click File Open in your text editor, then navigate to the following location:
C:\Windows\System32\drivers\etc\
To open the hosts file, click on it.
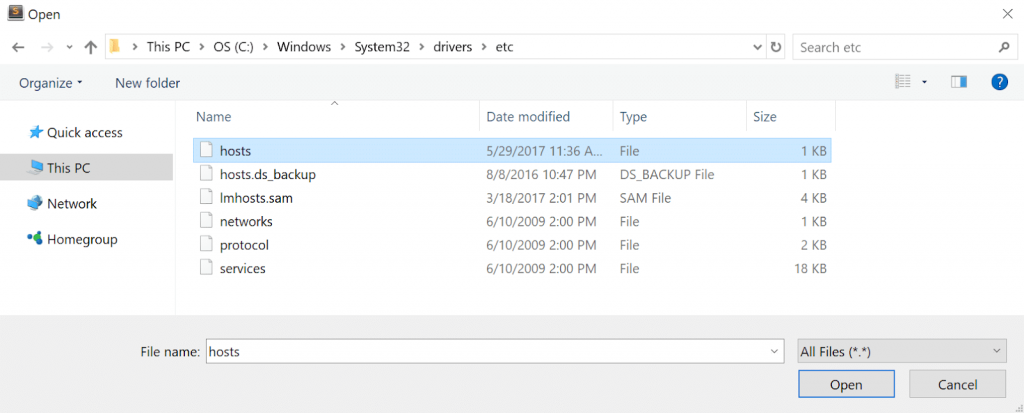
Make sure the website you’re trying to access isn’t included by checking twice. If so, get rid of it.
Mac
You can install Gas Mask if you want to check your hosts file on a Mac. It’s a free program that may be used to transition between editing host files and managing host files. Everything becomes quick and simple. If not, you can manually edit your hosts file on a Mac by following the instructions below.
Click “Terminal” after going to Utilities.
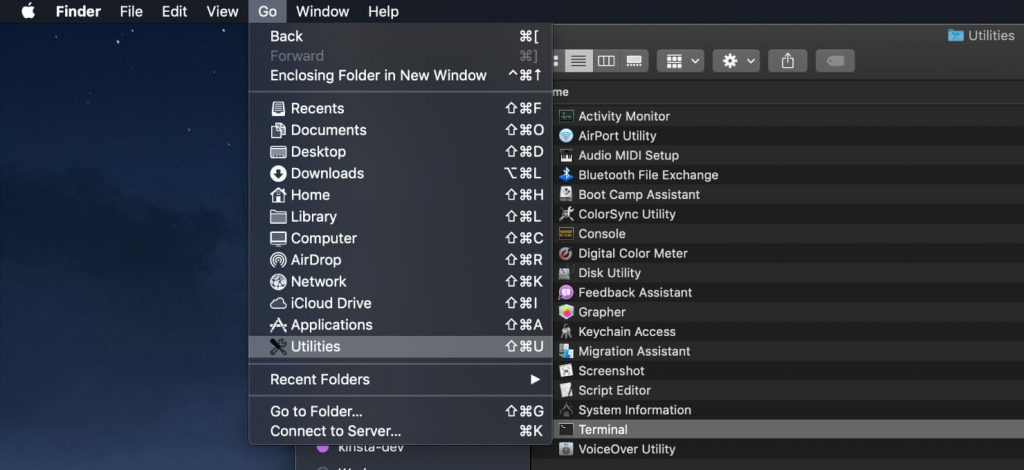
Put the following command in and hit Enter.
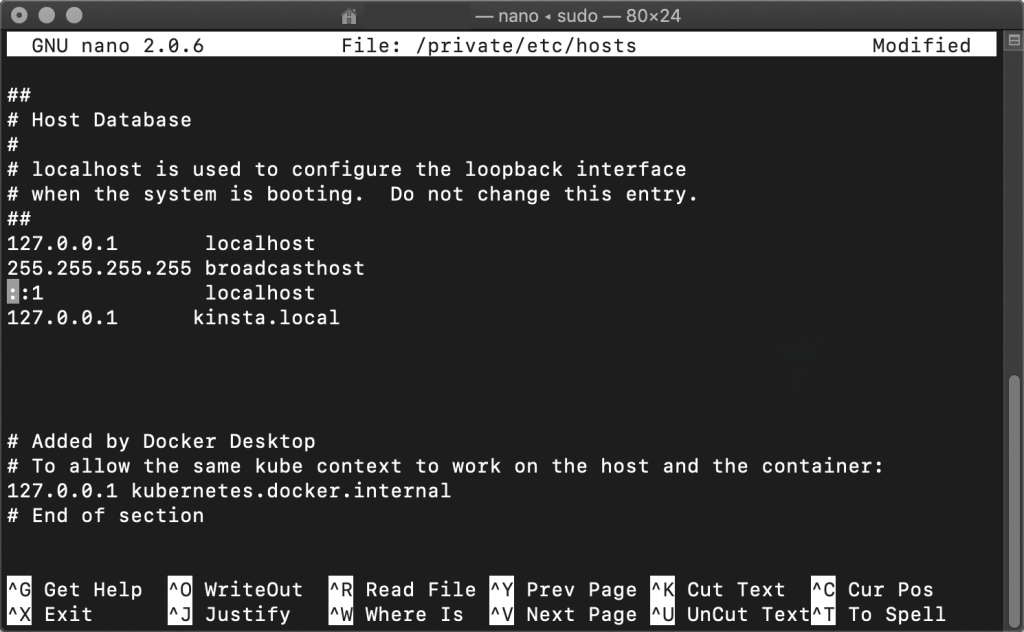
sudo nano /private/etc/hosts
Make sure the website you’re trying to access isn’t listed in your hosts file by checking twice. If so, get rid of it.
7. Check the DNS of your domain
Make sure your domain’s DNS is correctly pointing to your hosting company. If you just moved your WordPress website to a new server, it’s possible that your computer’s DNS cache was wrong. In that situation, the resolution should come from step 5 above. You might also need to wait a few hours for the DNS to fully propagate if it is simply too soon.
8. Clear browser cache
Your computer’s cache is where web browsers save information. This includes your browsing history, cookies, and saved login information. All of this information is kept in order to speed up the loading of the pertinent sites the next time they are accessed.
Caches are useful, but when they store a lot of information, they can cause a lot of problems. Fortunately, emptying your cache can quickly fix this issue.
However, you can quickly determine if it’s a problem with the browser cache by first starting your browser in incognito mode. Alternately, try using a different browser. You should proceed with cleaning your cache if you’re still having the issue.
We’ll be using Google Chrome for this example. Start by launching the main menu (in the top-right corner of your browser window). After that, choose More Tools. After that, select Clear browser data.
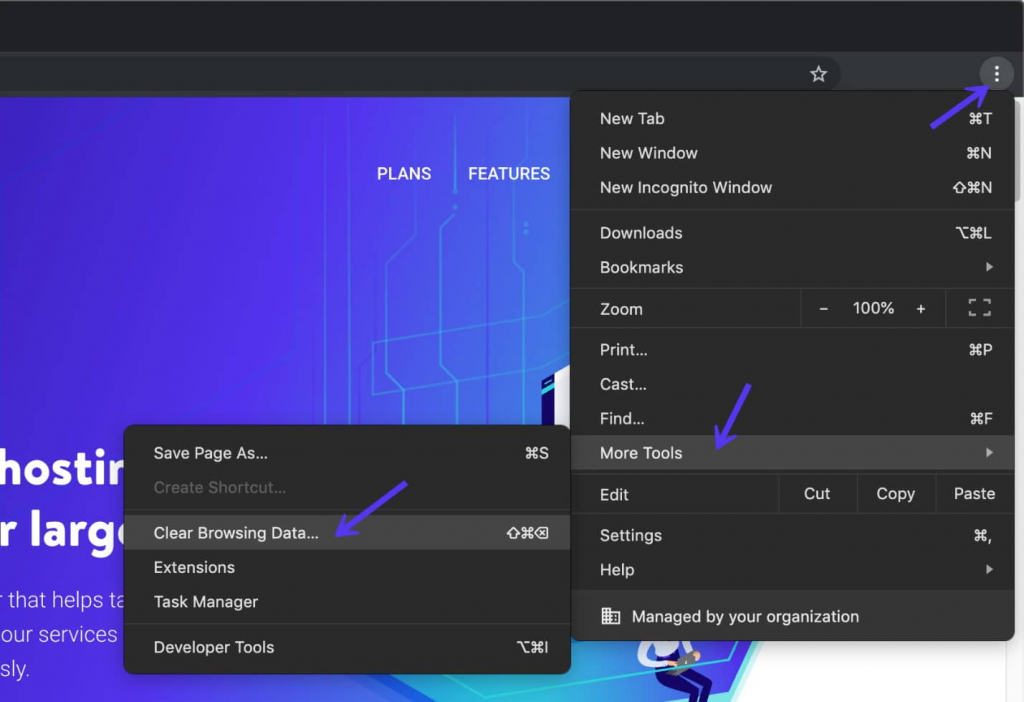
Make sure that all of the stated file categories are selected on the subsequent page. Chrome won’t be able to completely delete the cache if they aren’t. The most recent entries will only be deleted, which won’t have the desired impact.
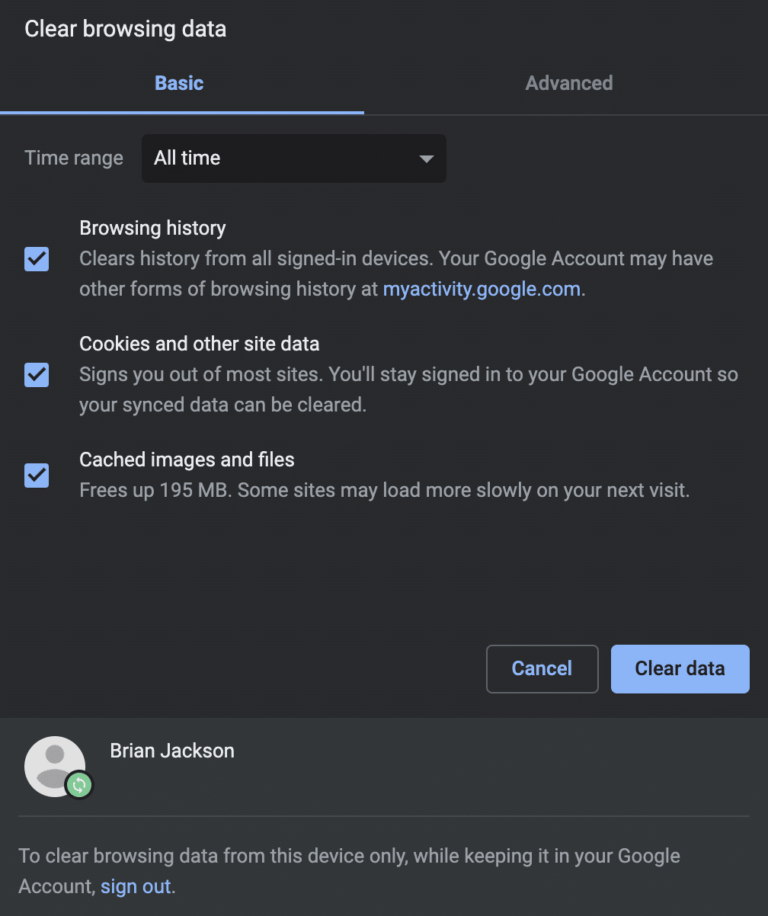
Entering the given URL into your address bar is an alternative way to finish this process:
chrome://settings/clearBrowserData
You should have access to the same choices as described above on the resulting screen.
Note: The remaining troubleshooting procedures we’ll cover involve setting up your WordPress site or server in a way that could assist in resolving the “ERR CONNECTION TIMED OUT” error.
9. Fix the maximum execution time
The first is your site’s maximum execution time. The default time is usually set to 30 seconds on servers. This is the time frame during which a PHP script may run (after which it times out). This is often set low or left at the default on shared hosts.
Since the php.ini file is on your server, you can’t readily change this from WordPress. We advise getting in touch with your hosting company to see if they can help you change this. It’s recommended to have 300 seconds set as the default maximum execution time.
One of the following choices given below can generally be used to adjust this if you wish to test it yourself. Both will be influenced by how your hosting company sets up its servers.
Option 1: Use php.ini file to modify the max execution time
Locate the max execution time option in any php.ini files you may have in your home directory and make the necessary changes. If it is now set to 30 seconds, for instance, you can boost it to 300 seconds.
max_execution_time = 300
Option 2: Use .htaccess file to modify the max execution time
You might be able to modify the execution time in your.htaccess file if the first approach doesn’t work. This is normally found in your home directory, much like the php.ini file is. The following code should go at the top of your.htaccess file:
php_value max_execution_time 300
10. Disable your plugins temporarily
Like with the majority of WordPress issues, a plugin may very well be the cause. You must turn off every plugin on your website in order to figure out whether that is what is going on. The “ERR CONNECTION TIMED OUT” issue, on the other hand, indicates that you don’t have access to your WordPress admin area. You will therefore need to SFTP into your site. It is advised that you use FileZilla.
When your SFTP client is prepared, use it to connect to your website and find the root folder for your WordPress installation. If you still can’t discover it, it’s typically known by the names public html, html, public, www, or the name of your website.
Go to the wp-content directory by opening that folder. You’ll find a folder within called plugins that has separate subdirectories for each of the plugins that are installed on your website (both active and inactive).
Right-clicking the plugins folder will allow you to rename it to something else. To make it simple for you to identify it afterwards, we suggest plugins.old or plugins.deactivated.
All of your plugins will no longer be accessible to WordPress. When that occurs, the plugins will be automatically disabled. Try logging into your WordPress dashboard now. If the timeout error is gone, one of your plugins might be the root cause of the problem. The only thing left to do is identify the faulty plugin.
Go back to the wp-content directory and properly rename the plugins folder you originally created there. Then, until you identify the offending plugin, you must disable each one one by one.
You can open wp-content/plugins directory to accomplish this. There is a folder for each of your plugins inside the directory. The steps you’ll take are very similar to those you already took:
- Start by renaming the first folder to anything you like.
- To see if the mistake has been fixed, check your website.
- If it isn’t, change the plugin folder’s name back to what it was in the previous step.
- Repeat the process above for the next plugin in your list.
If you have many plugins, this step may take some time, but it’s crucial to check each plugin individually. You can delete the offending plugin or switch to another program if you ever figure out what’s wrong with it. You can proceed to the next round of troubleshooting if you complete these steps without coming up with a solution.
11. Shift to the default theme temporarily
Now that you’ve ruled out your plugins, it’s time to rule out your active theme as a potential cause of the timeout problem. In actuality, compatibility problems may also be brought on by your theme.
Unfortunately, the procedure differs from the one described above. If you just rename the theme folder, WordPress won’t switch back to the default theme; instead, you’ll get an error saying something like “The theme directory “theme name” does not exist.” Or you get the error message “ERROR: The themes directory is either empty or doesn’t exist” if you try to rename the complete theme directory folder. Please double-check your setup.
Follow the steps given below if you want to switch to the default theme:
- First, log into your WordPress admin panel and go to the Appearance section.
- Next, find the theme you want to switch to and click the “Activate” button.
- Once the theme is activated, you’ll need to go to the Customize section and select the default theme settings.
- Finally, click the Save & Publish button to save your changes.
Check your website once more to see whether the issue has been resolved. If it did, it simply implies that your WordPress theme is malfunctioning, and you may want to try reinstalling it or rolling back to a recent backup.
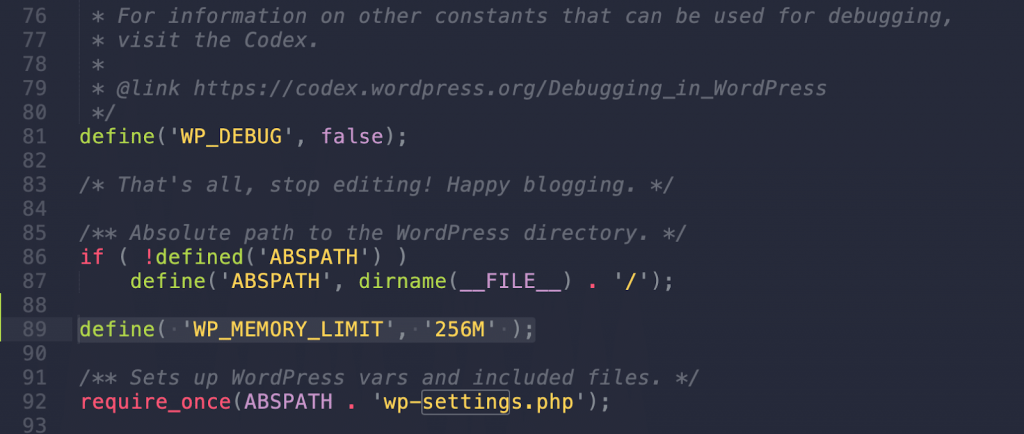
12. Increase memory limit
You can determine the maximum amount of memory that PHP is permitted to consume using the WP MEMORY LIMIT option. It’s probably set to a small number, like 64M, if you use shared hosting. You can set the maximum amount of memory to 256M for better results.
You can add the code given below to your wp-config.php file to raise the RAM limit. This has to come before the inclusion of wp-settings.php.
define( ‘WP_MEMORY_LIMIT’, ‘256M’ );
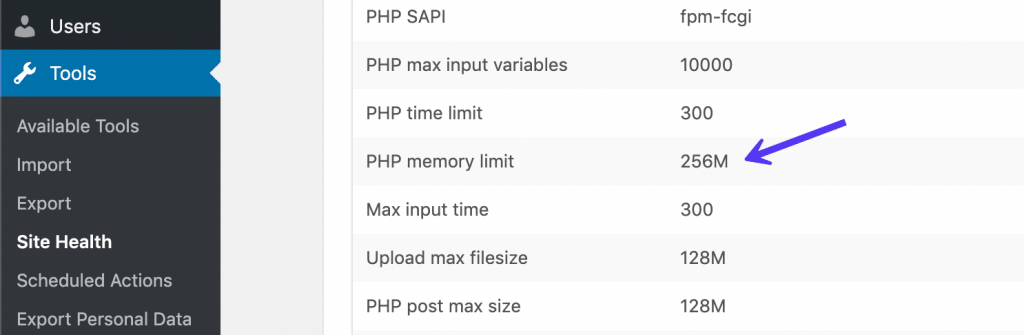
Uncertain of the PHP memory limit that is currently in place? If you are running WordPress 5.2 or higher and have access to your dashboard, you can view the PHP memory limit in the “Site Health” feature.
Wrapping Up
Although troubleshooting connection and timeout difficulties is never enjoyable, hopefully you now have a bit more knowledge under your belt to assist in resolving them quickly. It’s critical to keep in mind that the “ERR CONNECTION TIMED OUT” error could be caused by a client-side issue with your network connection or the server that hosts your WordPress website.
It is recommended to contact our WordPress specialists if the aforementioned fixes do not work. Our team of WordPress engineers may examine the website and its settings and look for setup issues on your end. We provide comprehensive WordPress maintenance and support services that’ll help you focus on your business while we take care of your website 24/7.