Subscribe
How to Fix Image Upload Issue in WordPress
Image upload is an essential aspect of a website, which is why WordPress has been built with an inbuilt image uploader. According to recent statistics, readers only remember 10% of the text content they read after three days. However, this number increases significantly to 65% when you add visually appealing images to your content.
Adding visuals to your content is a great way to engage your readers and help them remember your message long-term.
But sometimes, you may encounter an issue with the image uploader not working. If your uploader isn’t working, finding a solution can be frustrating and time-consuming. This blog will show you some of the most common reasons why the uploader isn’t working and how to fix it.
How to fix efficiently image upload error in WordPress
Ways to fix Image upload errors
1. File permissions
If you’re having trouble uploading images to your WordPress site, it’s likely due to file permissions. By default, WordPress only allows certain files to be uploaded, and images are usually not one of them.
The simplest way to fix this is to check the folder where images are stored, then change the permissions of that folder.
To access your media uploads, including images, navigate to the /wp-content/ folder and select the uploads folder. Go to uploads folder, right-click on it and select “File Permissions”.

Set the numeric value for each directory to 744, and all files must have 644 permissions. Check the Recurse into subdirectories option, and then select the “Apply to directories only” option.
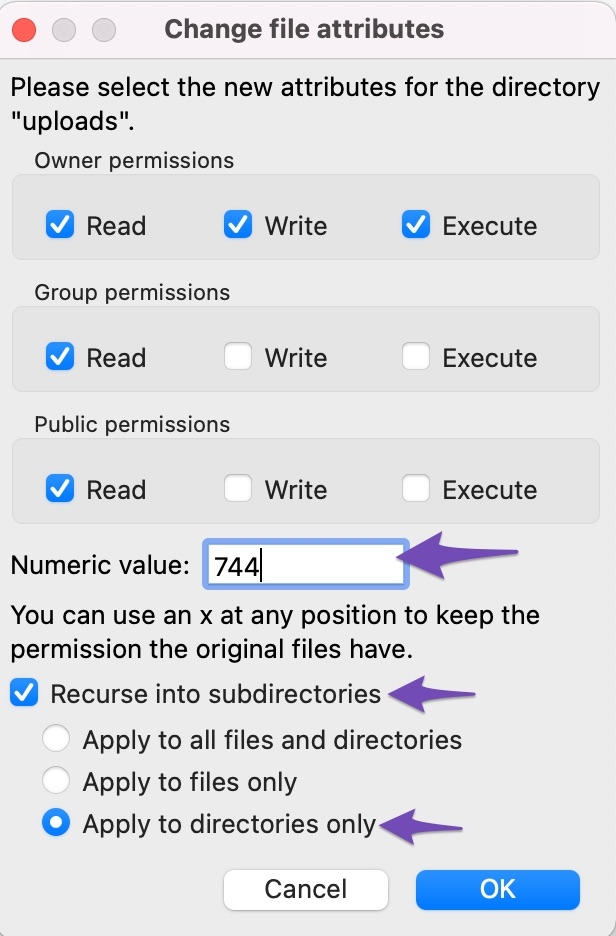
Click the OK button to save your changes and apply the file permissions for the directories. If the steps don’t work, re-write the value as 755 and try again.
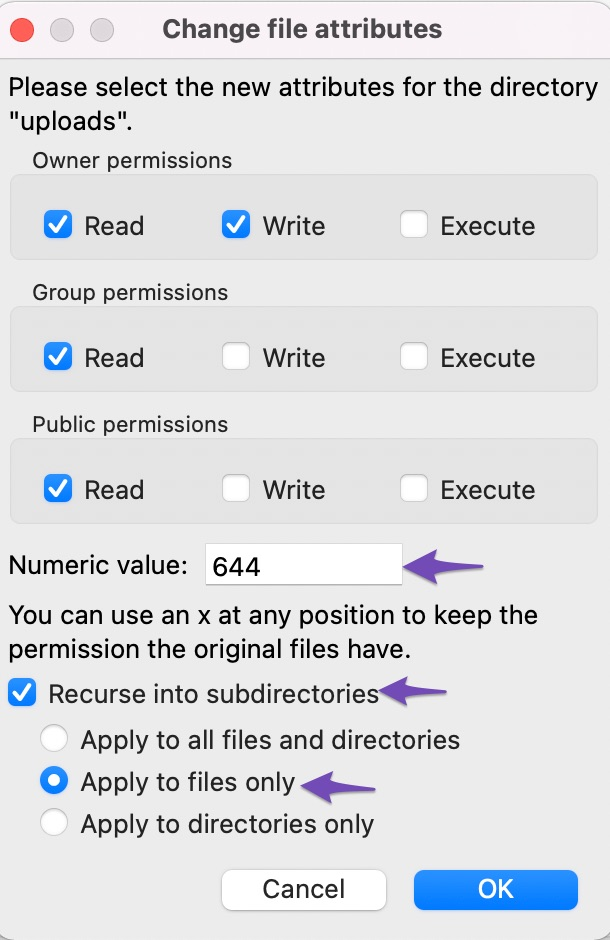
After setting up the directory for file uploads, you’ll need to set permissions for all the files in that directory. Right-click on the directory and select “File Permissions” in the menu. In the file permissions dialogue box, change the numeric value to 644.
Make sure the box next to “Recurse into subdirectories” is checked. Then, select the radio option that says “Apply to files only.” To save your changes, click the “OK” button.
If you have a lot of images, it may be easier to move them all into one directory, change the permissions of that directory, then copy them back out again.
2. Rename image
If the file name is too long or contains special characters, you might get this error. Try to rename the file to something shorter and more straightforward.
Make sure that the name of your image file ends with an extension such as .jpg or .png. For example, if you have an image named “testxyz%#ñ,” rename it to “test.jpg” or “test” and then upload the image again.
You need to take a few steps to remake images in WordPress.
- First, you need to open up the Media Library.
- Find the image you want to remake.
- Once you’ve found the image, click on the Edit button. This will open up the image editor, where you can make any changes you want to the image.
- Once you’re satisfied with the changes, click the Update button to save your changes.
3. Use the right file types
The file type must be supported by the plugin you’re using to upload images. For example, if you’re using Media Uploader, the default image uploader for Jetpack, you can only upload images in JPEG or PNG format. If you try to upload an unsupported file type, such as a PDF or Microsoft Word document, it will fail with an error message like this: “There was an error uploading your image.”
To fix this, check that the plugin supports the file type you’re trying to upload. If it isn’t, try uploading another file type supported by the plugin instead.
4. Resize images
Large images take up a lot of memory and CPU cycles on both the client and server side of things (your computer and web host). Some hosts have limitations on the maximum size of an uploaded file, and if you exceed that limit, it can cause your images not to display correctly.
To fix this, you’ll need to resize your image before uploading it. To do this, open the image in an editor, resize it, and save it as a new file name. Then, upload the new version of the image to WordPress, and it will be accepted without any problems.
Here’s a breakdown of different image sizes (in pixels) that work best for WordPress:
- Blog post image (1200 x 630)
- Header image (banner size 1048 x 250)
- Landscape Featured image (1200 x 900)
- Portrait Featured image size (900 x 1200)
- Background image (1920 x 1080)
- Logo image (200 x 100)
- Thumbnail image (150 x 150)
5. Clear cache
Clearing the cache is one of the most common solutions to almost all WordPress problems. It will refresh all the cache and update your website’s data properly. Clearing the cache will remove any temporary files causing issues with your website.
You can take a few steps to clear your WordPress cache and improve your site’s performance. Let’s suppose we have the WP Total Cache plugin installed, which is helpful for managing cache on WordPress websites.
- Log in to your WordPress site and go to the admin panel or dashboard.
- Go to the Dashboard and click on the Performance option in the top panel.
- Click on Purge All Caches to clear the cache.
- Once the cache has been cleared, you can go back to your WordPress site and check to see if the performance has improved.
If you’re still having trouble with your WordPress site’s performance, you can try a few other caching plugins or contact your web host for further assistance.
6. Deactivate plugins
A common cause of image upload failure is that you have a plugin installed that is incompatible with the current version of WordPress. To fix this, you need to deactivate all plugins and activate them one by one until the error disappears.
Here’s how you can deactivate all the plugins in WordPress:
Step 1: Go to Plugins > Installed Plugins in your WordPress admin panel.
Step 2: Scroll down, and you’ll see the option of bulk actions. Click on bulk actions to open a drop-down menu. One of the options in this drop-down menu is “Deactivate.” Click on this option.
Step 3: Click on “Apply” to deactivate all the plugins at once.
That’s it! You have now successfully deactivated all plugins in WordPress.
If the image upload issue persists, contact the plugin developer for assistance.
7. Increase PHP memory limit
You may get an HTTP error when you attempt to upload a picture. This issue may be brought on by low server resources or unusual traffic. Therefore, it’s wise to give yourself time to pass before uploading the photograph again.
You might have used all the available WordPress RAM if the issue still exists. You can increase the PHP memory limit using cPanel to resolve the issue.
To increase the memory limit, follow these steps:
Log in to your cPanel account.
Click on “Select PHP version,” which is present under the Software section.
Click on the “Switch to PHP Options” button.
Set the value of the “memory_limit” parameter to a higher number than the previous one.
The system will automatically update the new value once you make the change. A green box with a success message will confirm that the change was applied successfully.
8. Try a different browser
If you are using a different browser to upload the image, then it could be possible that your host does not support the browser or that you are using an older browser version that is incompatible with your host. You should always use the latest version of browsers like Firefox or Google Chrome while uploading images.
9. Restart your computer
Restarting a computer often fixes many software problems without requiring further work from users (except perhaps waiting while it restarts). Restarting clears out temporary files that may have been causing problems and resets any settings that might have been changed (without having to go through a lengthy process of finding those settings).
Wrapping Up
Though there are some simple reasons you might be having trouble uploading images in WordPress, diagnosing the issue can be confusing. Hopefully, this will help you identify the problem and get things working again.
In terms of the steps you can take to ensure your media uploading is working correctly, remove any plugins that are no longer needed. Once you’ve gotten rid of old or unused plugins, then it’s time to try uploading media again to see if anything has changed.
There’s no need to go it alone when you’re feeling stuck – experts always offer help. If you’re having difficulties with your WordPress site, reach out to stylemixthemes.com for support and maintenance services. With our expert help, you can quickly get your site back up and running.
At Stylemix, we provide comprehensive WordPress support and maintenance. This includes resolving bugs, conducting daily audits, and providing real-time security monitoring. If you want to improve your website’s consistency and speed, you can hire a team of experienced WordPress developers dedicated to working on your website.